Showing posts with label docker. Show all posts

Tuesday, April 26, 2016

Deploy and configure a local Docker caching proxy

Recently I was looking into caching for Docker layers downloading for the Fabric8 development environment, to allow me to trash the vms where my Docker daemon was running and still avoiding me to re-download basic images each single time I recreate my vm.

As usual, I tried to hit Google first, and was pointed to these couple of pages:

http://unpoucode.blogspot.it/2014/11/use-proxy-for-speeding-up-docker-images.html

and

https://blog.docker.com/2015/10/registry-proxy-cache-docker-open-source/

Since I use quite often Jerome Petazzoni’s approach for a transparent Squid + iptables to cache and sniff simple http traffic (usually http invocation from java programs), I’ve found that the first solution based made sense, so I have tried that first.

It turned out that the second link was what I was looking for; but I have still spent some good learning hours with the no longer working suggestions from the first one, learning the hard way that Squid doesn’t play that nice with Amazon’s Cloudfront CDN, used by Docker Hub. But I have to admit that it’s been fun.
Now I know how to forward calls to Squid to hit an intermediate interceptors that mangles with query params, headers and everything else.
I couldn’t find a working combination for Cloudfront but I am now probably able to reproduce the infamous Cats Proxy Prank. =)

Anyhow, as I was saying, what I was really looking for is that second link that shows you how to setup an intermediate Docker proxy, that your Docker daemon will try to hit, before defaulting to the usual Docker Hub public servers.

Almost everything that I needed was in that page, but I have found the information to be a little more cryptic that needed.

The main reason for that is because that example assumes I need security (TLS), which is not really my case since the proxy is completely local.

Additionally, it shows how to configure you Docker Registry using YAML configuration. Again, not really complex, but indeed more than needed.

Yes, because what you really need to bring up the simplest local (not secured) Docker proxy is this oneliner:

docker run -p 5000:5000 -d --restart=always --name registry   \
  -e REGISTRY_PROXY_REMOTEURL=http://registry-1.docker.io \
  registry:2

The interesting part here is that registry image, supports a smart alternative way to forward configuration to it, that saves you from passing it a YAML confguration file.

The idea, described here, is that if you follow a naming convention for the environment variables, that reflects the hierarchy of the YAML tree, you can turn something like:

...
proxy:
  remoteurl: http://registry-1.docker.io
...

That you should write in a .yaml file and pass to the process in this way:

docker run -d -p 5000:5000 --restart=always --name registry \
  -v `pwd`/config.yml:/etc/docker/registry/config.yml \
  registry:2

Into the much more conventient -e REGISTRY_PROXY_REMOTEURL=http://registry-1.docker.io runtime environment variable!

Let’s improve the example a little, so that we also pass our Docker proxy a non-volatile storage location for the cached layers, so that we are not losing them between invocations:

docker run -p 5000:5000 -d --restart=always --name registry   \
  -e REGISTRY_PROXY_REMOTEURL=http://registry-1.docker.io \
  -v /opt/shared/docker_registry_cache:/var/lib/registry \
  registry:2

Now we have everything we needed to save a good share of bandwidth, each time we need to get some Docker image that had already passed through our local proxy.

The only remaining bit is to tell our Docker daemon to be aware of the new proxy:

# update your docker daemon config, according to your distro
# content of my `/etc/sysconfig/docker` in Fedora 23
OPTIONS=" --registry-mirror=http://localhost:5000"

Reload (or restart) your Docker daemon and you are done! Just be aware that if you restart the daemon you might need also to re-start the Registry container, if you ware working on a single node.

An interesting discovery, it’s been learning that Docker daemon doesn’t break if it cannot find the specified registry-mirror. So you can add the configuration and forget about it, knowing that your interaction with Docker Hub will just benefit of possible hits your caching proxy, assuming it’s running.

You can see it working with the following tests:

docker logs -f registry

will log all the outgoing download requests, and once the set of requrests that compose a single pull image operation will be completed, you will also be able to check that the image is now completely served by your proxy with this invocation:

curl http://localhost:5000/v2/_catalog
# sample output
{"repositories":["drifting/true"]}

The article would be finished, but since I feel bad to show how to disable security on the internet, here’s also a very short and fully working and tested example of how to implement the same with TLS enabled:

# generate a self signed certificate; accept default for every value a part from Common Name where you have to put your box hostname
mkdir -p certs && openssl req  -newkey rsa:4096 -nodes -sha256 -keyout certs/domain.key  -x509 -days 365 -out certs/domain.crt

# copy to the locally trusted ones, steps for Fedora/Centos/RHEL
sudo cp certs/domain.crt /etc/pki/ca-trust/source/anchors/

# load the newly added certificate
sudo update-ca-trust enable

# run the registy using those keys that you have generated, mounting the files inside the container
docker run -p 5000:5000 --restart=always --name registry \
  -v `pwd`/certs:/certs \
  -e REGISTRY_HTTP_TLS_CERTIFICATE=/certs/domain.crt \
  -e REGISTRY_HTTP_TLS_KEY=/certs/domain.key \
  -e REGISTRY_PROXY_REMOTEURL=https://registry-1.docker.io \
  registry:2

# now you just need to remember that you are working in https, so you need to use that protocol in your docker daemon configuration, instead of plain http; also use that when you interact with the API in curl

Monday, May 5, 2014

Continuous Integration with JBoss Fuse, Jenkins and Nexus

Recently I was putting together a quickstart Maven project to show a possible approach to the organization of a JBoss Fuse project.

The project is available on Github here: https://github.com/paoloantinori/fuse_ci

And it’s an slight evolution of what I have learnt working with my friend James Rawlings

The project proposes a way to organize your codebase in a Maven Multimodule project.
The project is in continuous evolution, thanks to feedback and suggestions I receive; but it’s key point is to show a way to organize all the artifacts, scripts and configuration that compose your project.

In the ci folder you will find subfolders like features or karaf_scripts with files you probably end up creating in every project and with inline comments to help you with tweaking and customization according to your specific needs.
The project makes also use of Fabric8 to handle the creation of a managed set of OSGi containers and to benefit of all its features to organize workflows, configuration and versioning of your deployments.
In this blogpost I will show you how to deploy that sample project in a very typical development setup that includes JBoss Fuse, Maven, Git, Nexus and Jenkins.
The reason why I decided to cover this topic is because I find that many times I meet good developers that tell me that even if they are aware of the added value of a continuous integration infrastructure, have no time to dedicate to the activity. With no extra time they focus only to development.

I don’t want you to evangelize around this topic or try to tell you what they should do. I like to trust them and believe they know their project priorities and that they accepted the trade-off among available time, backlog and the added overall benefits of each activity. Likewise I like to believe that we all agree that for large and long projects, CI best practices are definitely a must-do and that no one has to argue about their value.

With all this in mind, I want to show a possible setup and workflow, to show how quickly it is to invest one hour of your time for benefits that are going to last longer.

I will not cover step by step instructions. But to prove you that all this is working I have created a bash script, that uses Docker, and that will demonstrate how things can be easy enough to get scripted and, more important, that they really work!

If you want to jump straight to the end, the script is available here:
https://github.com/paoloantinori/fuse_ci/blob/master/ci/deploy_scripts/remote_nexus.sh

It uses some Docker images I have created and published as trusted builds on Docker Index:
https://index.docker.io/u/pantinor/fuse/
https://index.docker.io/u/pantinor/centos-jenkins/
https://index.docker.io/u/pantinor/centos-nexus/

They are a convenient and reusable way to ship executables and since they show the steps performed; they may also be seen as a way to document the installation and configuration procedure.
As mentioned above, you don’t necessarily need them. You can manually install and configure the services yourself. They are just an verified and open way to save you some time or to show you the way I did it.


Let’s start describing the component of our sample Continuous Integration setup:

1) JBoss Fuse 6.1
It’s the runtime we are going to deploy onto. It lives in a dedicated box. It interacts with Nexus as the source of the artifacts we produce and publish.

2) Nexus
It’s the software we use to store the binaries we produce from our code base. It is accessed by JBoss Fuse, that downloads artifacts from it but it is also accessed from Jenkins, that publishes binaries on it, as the last step of a successful build job.

3) Jenkins
It’s our build jobs invoker. It publishes its outputs to Nexus and it builds its output if the code it checked out with Git builds successfully.

4) Git Server
It’s the remote code repository holder. It’s accessed by Jenkins to download the most recent version of the code we want to build and it’s populated by all the developers when they share their code and when they want to build on the Continous Integration server. In our case, git server is just a filesystem accessed via ssh.
Interaction Diagram
http://yuml.me/edit/7e75fab5

git


First thing to do is to setup git to act as our source code management (SCM).
As you may guess we might have used every other similar software to do the job, from SVN to Mercurial, but I prefer git since it’s one of the most popular choices and also because it’s an officially supported tool to interact directly with Fabric8 configuration
We don’t have great requirements for git. We just need a filesystem to store our shared code and a transport service that allows to access that code.
To keep things simple I have decided to use SSH as the transport protocol.
This means that on the box that is going to store the code we need just sshd daemon started, some valid user, and a folder they can access.
Something like:

yum install -y sshd git
service sshd start
adduser fuse
mkdir -p /home/fuse/fuse_scripts.git
chmod a+rwx /home/fuse/fuse_scripts.git # or a better stratey based on guid
 
While the only git specific step is to initialize the git repository with

git init --bare /home/fuse/fuse_scripts.git

Nexus


Nexus OSS is a repository manager that can be used to store Maven artifacts.
It’s implemented as a java web application. For this reason installing Nexus is particularly simple.
Thanks to the embedded instance of Jetty that empowers it, it’s just a matter of extracting the distribution archive and starting a binary:

wget http://www.sonatype.org/downloads/nexus-latest-bundle.tar.gz /tmp/nexus-latest-bundle.tar.gz
tar -xzvf /tmp/nexus-latest-bundle.tar.gz -C /opt/nexus
/opt/nexus/nexus-*/bin/nexus 
 
Once started Nexus will be available by default at this endpoint:
http://your_ip/8081/nexus
with admin as user and admin123 as password.


Jenkins


Jenkins is the job scheduler we are going to use to build our project. We want to configure Jenkins in such a way that it will be able to connect directly to our git repo to download the project source.
To do this we need an additional plugin, Git Plugin.
We obviously also need java and maven installed on the box.
Being Jenkins configuration composed of various steps involving the interaction with multiple administrative pages, I will only give some hints on the important steps you are required to perform. For this reason I strongly suggest you to check my fully automated script that does everything in total automation.
Just like Nexus, Jenkins is implemented as a java web application.
Since I like to use RHEL compatible distribution like Centos or Fedora, I install Jenkins in a simplified way. Instead of manually extracting the archive like we did for Nexus, I just define the a new yum repo, and let yum handle the installation and configuration as a service for me:

wget http://pkg.jenkins-ci.org/redhat/jenkins.repo -O /etc/yum.repos.d/jenkins.repo
rpm --import http://pkg.jenkins-ci.org/redhat/jenkins-ci.org.key
yum install jenkins
service jenkins start
 
Once Jenkins is started you will find it’s web interface available here:
http://your_ip:8080/

By default it’s configured in single user mode, and that’s enough for our demo.
You may want to verify the http://your_ip:8080/configure to check if values for JDK, Maven and git look good. They are usually automatically picked up if you have those software already installed before Jenkins.

Then you are required to install Git Plugin:
http://your_ip:8080/pluginManager

Once you have everything configured, and after a restart of Jenkins instance, we will be able to see a new option in the form that allows us to create a Maven build job.
Under the section: Source Code Management there is now the option git. It’s just a matter of providing the coordinates of your SSH server, for example:

ssh://fuse@172.17.0.5/home/fuse/fuse_scripts.git


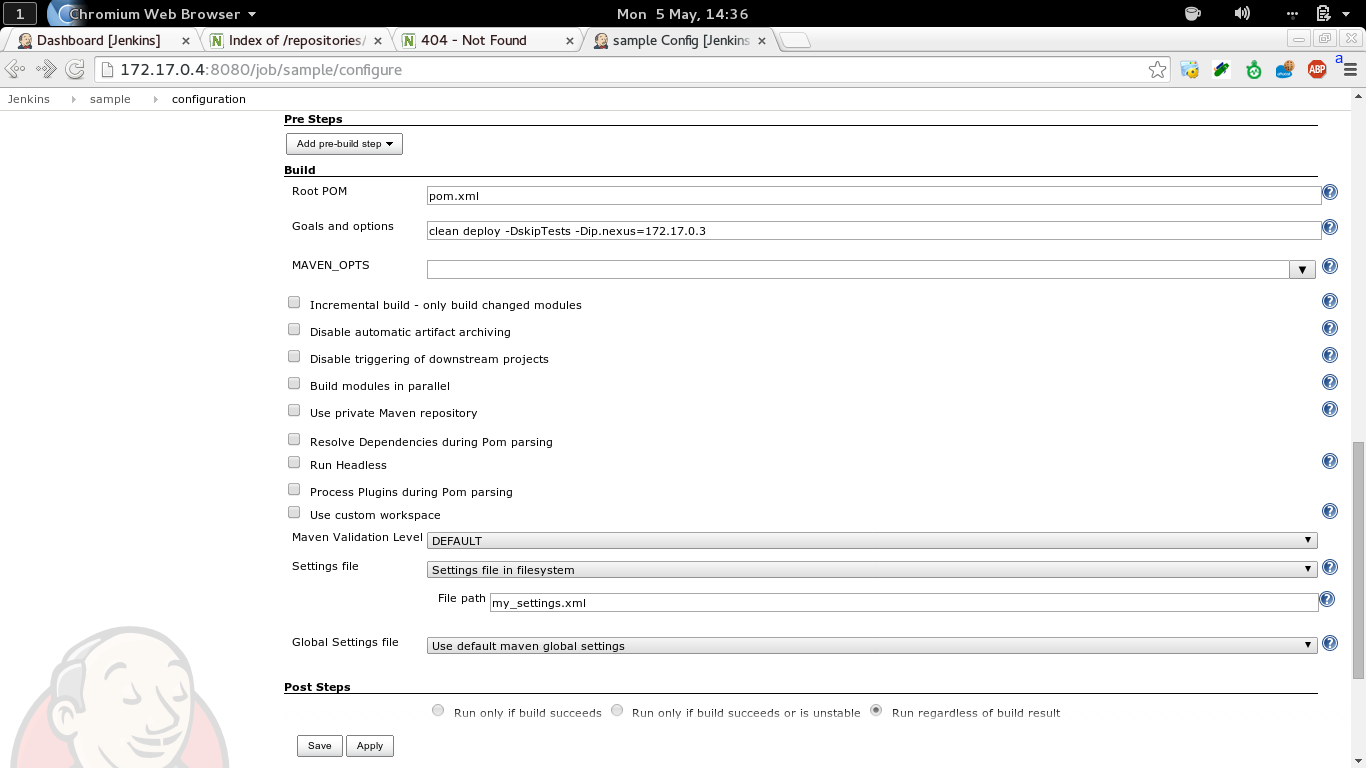
And in the section Build , under Goals and options, we need to explicitly tell Maven we want to invoke the deploy phase, providing the ip address of the Nexus insance:

clean deploy -DskipTests -Dip.nexus=172.17.0.3

The last configuration step, is to specify a different maven settings file, in the advanced maven properties , that is stored together with the source code:
https://github.com/paoloantinori/fuse_ci/blob/master/my_settings.xml

And that contains user and password to present to Nexus, when pushing artifacts there.

The configuration is done but we need an additional step to have Jenkins working with Git.
Since we are using SSH as our transport protocol, we are going to be asked, when connecting to the SSH server for the first time, to confirm that the server we are connecting to is safe and that its fingerprint is the one the we were expecting. This challenge operation will block the build job, since a batch job and there will not be anyone confirming SSH credentials.
To avoid all this, a trick is to connect to the Jenkins box via SSH, become the user that is used to run Jenkins process, jenkins in my case, and from there, manually connect to the ssh git server, to perform the identification operation interactively, so that it will no longer required in future:

ssh fuse@IP_GIT_SERVER
The authenticity of host '[172.17.0.2]:22 ([172.17.0.2]:22)' can't be established.
DSA key fingerprint is db:43:17:6b:11:be:0d:12:76:96:5c:8f:52:f9:8b:96.
Are you sure you want to continue connecting (yes/no)? 
 
The alternate approach I use my Jenkins docker image is to totally disable SSH fingerprint identification, an approach that maybe too insecure for you:

mkdir -p /var/lib/jenkins/.ssh ;  
printf "Host * \nUserKnownHostsFile /dev/null \nStrictHostKeyChecking no" >> /var/lib/jenkins/.ssh/config ; 
chown -R jenkins:jenkins /var/lib/jenkins/.ssh
 
If everything has been configured correctly, Jenkins will be able to automatically download our project, build it and publish it to Nexus.

But…

Before doing that we need a developer to push our code to git, otherwise there will not be any source file to build yet!
To to that, you just need to clone my repo, configure an additional remote repo (our private git server) and push:

git clone git@github.com:paoloantinori/fuse_ci.git
git remote add upstream ssh://fuse@$IP_GIT/home/fuse/fuse_scripts.git
git push upstream master
 
At this point you can trigger the build job on Jenkins. If it’s the first time you run it Maven will download all the dependencies, so it may take a while.
if everything is successful you will receive the confirmation that your artifacts have been published to Nexus.

JBoss Fuse


Now that our Nexus server is populated with the maven artifacts built from our code base, we just need to tell our Fuse instance to use Nexus as a Maven remote repository.
Teaches us how to do it:
In a karaf shell we need to change the value of a property,

fabric:profile-edit  --pid io.fabric8.agent/org.ops4j.pax.url.mvn.repositories=\"http://172.17.0.3:8081/nexus/content/repositories/snapshots/@snapshots@id=sample-snapshots\" default

And we can now verify that the integration is completed with this command:

cat  mvn:sample/karaf_scripts/1.0.0-SNAPSHOT/karaf/create_containers
 
If everything is fine, you are going to see an output similar to this:

# create broker profile
fabric:mq-create --profile $BROKER_PROFILE_NAME $BROKER_PROFILE_NAME
# create applicative profiles
fabric:profile-create --parents feature-camel MyProfile

# create broker
fabric:container-create-child --jvm-opts "$BROKER_01_JVM" --resolver localip --profile $BROKER_PROFILE_NAME root broker

# create worker
fabric:container-create-child --jvm-opts "$CONTAINER_01_JVM" --resolver localip root worker1
# assign profiles
fabric:container-add-profile worker1 MyProfile
 
Meaning that addressing a karaf script providing Maven coordinates worked well, and that now you can use shell:source, osgi:install or any other command you want that requires artifacts published on Nexus.

Conclusion


As mentioned multiple times, this is just a possible workflow and example of interaction between those platforms.
Your team may follow different procedures or using different instruments.
Maybe you are already implementing more advanced flows based on the new Fabric8 Maven Plugin.
In any case I invite everyone interested in the topic to post a comment or some link to different approach and help everyone sharing our experience.

Wednesday, March 12, 2014

Integration testing with Maven and Docker

Docker is one of the new hot things out there. With a different set of technologies and ideas compared to traditional virtual machines, it implements something similar and at the same time different, with the idea of containers: almost all VMs power but much faster and with very interesting additional goodies.

In this article I assume you already know something about Docker and know how to interact with it. If it's not the case I can suggest you these links to start with:

http://www.docker.io/gettingstarted
http://coreos.com/docs/launching-containers/building/getting-started-with-docker/
http://robknight.org.uk/blog/2013/05/drupal-on-docker/

My personal contribution to the topic is to show you a possible workflow that allows you to start and stop Docker containers from within a Maven job.

The reason why I have investigated in this functionality is to help with tests and integration tests in Java projects built with Maven. The problem is well known: your code interacts with external systems and services. Depending on what you are really writing this could mean Databases, Message Brokers, Web Services and so on.

The usual strategies to test these interactions are:

  • In memory servers; implemented in java that are usually very fast but too often their limit is that they are not the real thing
  • A layer of stubbed services, that you implement to offers the interfaces that you need.
  • Real external processes, sometimes remote, to test real interactions.

Those strategies work but they often require a lot of effort to be put in place. And the most complete one, that is the one that uses proper external services, poses problems for what concerns isolation:
imagine that you are interacting with a database and that you perform read/write operations just while someone else was accessing the same resources. Again, you may find the correct workflows that invovle creating separate schemas and so on, but, again, this is extra work and very often a not very straight forward activity.

Wouldn't it be great if we could have the same opportunities that these external systems offers, but in totaly isolation? And what do you think if I also add speed to the offer?

Docker is a tool that offers us this opportunity.

You can start a set of Docker container with all the services that you need, at the beginning of the testing suite, and tear it down at the end of it. And your Maven job can be the only consumer of these services, with all the isolation that it needs. And you can all of this easily scripted with the help of Dockerfiles, that are, at the end, not much more than a sequential set of command line invocations.

Let see how to enable all of this.

The first prerequisite is obviously to have Docker installed on your system. As you may already know Docker technology depends on the capabilities of the Linux Kernel, so you have to be on Linux OR you need the help of a traditional VM to host the Docker server process.

This is the official documentation guide that shows you how to install under different Linux distros:

http://docs.docker.io/en/latest/installation/

While instead this is a very quick guide to show how to install if you are on MacOSX:

http://blog.javabien.net/2014/03/03/setup-docker-on-osx-the-no-brainer-way/

Once you are ready and you have Docker installed, you need to apply a specific configuration.

Docker, in recents versions, exposes its remote API, by default, only over Unix Sockets. Despite we could interact with them with the right code, I find much easier to interact with the API over HTTP. To obtain this, you have to pass a specific flag to the Docker daemon to tell it to listen also on HTTP.

I am using Fedora, and the configuration file to modify is /usr/lib/systemd/system/docker.service.

[Unit]
Description=Docker Application Container Engine
Documentation=http://docs.docker.io
After=network.target

[Service]
ExecStart=/usr/bin/docker -d -H tcp://127.0.0.1:4243 -H unix:///var/run/docker.sock
Restart=on-failure

[Install]
WantedBy=multi-user.target

The only modification compared to the defaults it's been adding -H tcp://127.0.0.1:4243.

Now, after I have reloaded systemd scripts and restarted the service I have a Docker daemon that exposes me a nice REST API I can poke with curl.

sudo systemctl daemon-reload
sudo systemctl restart docker
curl http://127.0.0.1:4243/images/json # returns a json in output

You probably also want this configuration to survive future Docker rpm updates. To achieve that you have to copy the file you have just modified to a location that survives rpm updates. The correct way to achieve this in systemd is with:

sudo cp /usr/lib/systemd/system/docker.service /etc/systemd/system

See systemd FAQ for more details.

If you are using Ubuntu you have to configure a different file. Look at this page: http://blog.trifork.com/2013/12/24/docker-from-a-distance-the-remote-api/

Now we have all we need to interact easily with Docker.

You may at this point expect me to describe you how to use the Maven Docker plugin. Unluckily that's not the case. There is no such plugin yet, or at least I am not aware of it. I am considering writing one but for the moment being I have solved my problems quickly with the help of GMaven plugin, a little bit of Groovy code and the help of the java library Rest-assured.

Here is the code to startup Docker containers

import com.jayway.restassured.RestAssured
import static com.jayway.restassured.RestAssured.*
import static com.jayway.restassured.matcher.RestAssuredMatchers.*
import com.jayway.restassured.path.json.JsonPath
import com.jayway.restassured.response.Response

RestAssured.baseURI = "http://127.0.0.1"
RestAssured.port = 4243

// here you can specify advance docker params, but the mandatory one is the name of the Image you want to use
def dockerImageConf = '{"Image":"${docker.image}"}'
def dockerImageName = JsonPath.from(dockerImageConf).get("Image")

log.info "Creating new Docker container from image $dockerImageName"
def response =  with().body(dockerImageConf).post("/containers/create")

if( 404 == response.statusCode ) {
    log.info "Docker image not found in local repo. Trying to dowload image '$dockerImageName' from remote repos"
    response = with().parameter("fromImage", dockerImageName).post("/images/create")
    def message = response.asString()
    //odd: rest api always returns 200 and doesn't return proper json. I have to grep
    if( message.contains("HTTP code: 404") ) fail("Image $dockerImageName NOT FOUND remotely. Abort. $message}")
    log.info "Image downloaded"
    
    // retry to create the container
    response = with().body(dockerImageConf).post("/containers/create")
    if( 404 == response.statusCode ) fail("Unable to create container with conf $dockerImageConf: ${response.asString()}")
}

def containerId = response.jsonPath().get("Id")

log.info "Container created with id $containerId"

// set the containerId to be retrieved later during the stop phase
project.properties.setProperty("containerId", "$containerId")

log.info "Starting container $containerId"
with().post("/containers/$containerId/start").asString()

def ip = with().get("/containers/$containerId/json").path("NetworkSettings.IPAddress")

log.info "Container started with ip: $ip" 

System.setProperty("MONGODB_HOSTNAME", "$ip")
System.setProperty("MONGODB_PORT", "27017")

And this is the one to stop them

import com.jayway.restassured.RestAssured
import static com.jayway.restassured.RestAssured.*
import static com.jayway.restassured.matcher.RestAssuredMatchers.*

RestAssured.baseURI = "http://127.0.0.1"
RestAssured.port = 4243

def containerId = project.properties.getProperty('containerId')
log.info "Stopping Docker container $containerId"
with().post("/containers/$containerId/stop")
log.info "Docker container stopped"
if( true == ${docker.remove.container} ){
    with().delete("/containers/$containerId")
    log.info "Docker container deleted"
}

Rest-assured fluent API should suggest what is happening, and the inline comment should clarify it but let me add a couple of comments. The code to start a container is my implementation of the functionality of docker run as described in the official API documentation here:

http://docs.docker.io/en/latest/reference/api/docker_remote_api_v1.9/#inside-docker-run

The specific problem I had to solve was how to propagate the id of my Docker container from a Maven Phase to another one.
I have achieved the functionality thanks to the line:

// set the containerId to be retrieved later during the stop phase
project.properties.setProperty("containerId", "$containerId")

I have also exposed a couple of Maven properties that can be useful to interact with the API:

  • docker.image - The name of the image you want to spin
  • docker.remove.container - If set to false, tells Maven to not remove the stopped container from filesystem (useful to inspect your docker container after the job has finished)

Ex.

    mvn verify -Ddocker.image=pantinor/fuse -Ddocker.remove.container=false

You may find here a full working example. I have been told that sometimes my syntax colorizer script eats some keyword or change the case of words, so if you want to copy and paste it may be a better idea cropping from Github.

This is a portion of the output while running the Maven build with the command mvn verify :

...
[INFO] --- gmaven-plugin:1.4:execute (start-docker-images) @ gmaven-docker ---
[INFO] Creating new Docker container from image {"Image":"pantinor/centos-mongodb"}
log4j:WARN No appenders could be found for logger (org.apache.http.impl.conn.BasicClientConnectionManager).
log4j:WARN Please initialize the log4j system properly.
[INFO] Container created with id 5283d970dc16bd7d64ec08744b5ecec09b57d9a81162826e847666b8fb421dbc
[INFO] Starting container 5283d970dc16bd7d64ec08744b5ecec09b57d9a81162826e847666b8fb421dbc
[INFO] Container started with ip: 172.17.0.2

...

[INFO] --- gmaven-plugin:1.4:execute (stop-docker-images) @ gmaven-docker ---
[INFO] Stopping Docker container 5283d970dc16bd7d64ec08744b5ecec09b57d9a81162826e847666b8fb421dbc
[INFO] Docker container stopped
[INFO] Docker container deleted

...

If you have any question or suggestion please feel free to let me know!

Full Maven `pom.xml` available also here:

https://raw.githubusercontent.com/paoloantinori/gmaven_docker/master/pom.xml


    4.0.0
    gmaven-docker
    paolo.test
    1.0.0-SNAPSHOT
    Sample Maven Docker integration
    See companion blogpost here: http://giallone.blogspot.co.uk/2014/03/integration-testing-with-maven-and.html
    
        pantinor/centos-mongodb
        true


                org.codehaus.gmaven
                gmaven-plugin
                1.4
                
                    2.0


                        start-docker-images
                        test
                        
                            execute


                        stop-docker-images
                        post-integration-test
                        
                            execute


            com.jayway.restassured
            rest-assured
            1.8.1
            test