Sunday, August 11, 2013

Share your Bash history across terminals in Terminator

As many developers I spent lots of time working with a command line shell. My operating system of choice is Fedora (currently 18) and I am using the excellent Terminator as a more powerful replacement for the basic default shell that comes with Gnome 3.

The typical workflow with Terminator is to use its very intuitive key shortcuts to split the current working window, maximize it, start working, resize when finish and jump back to any other window of interest.

It's a very fast workflow and I cannot see myself going back to anything different.

But this high productive usage has a drawback:

the commands history is not shared across the different windows!

This is often annoying since one of the reasons I am spawning a new shell is to do some "temporary" work without moving away from my current position. And this usually involves redoing some already executed step, so the lack of history is quite annoying.

I will describe here a way to address this problem.

The first thing to know is that the command history is not present because by default bash history is flushed to .bash_history only when you terminate a session.

A way to force a more frequent flush is to play with the environment variable PROMPT_COMMAND

If we modify one of our bash configuration files, .bashrc for instance.

#save history after every command
#use 'history -r' to reload history
PROMPT_COMMAND="history -a ; $PROMPT_COMMAND" 

What we are saying here is to invoke history -a with every new command prompt line. This flush the history to file every time we see a new command prompt. You can verify this if you monitory you .bash_history file.

Have we reached what we were hoping for?

Not yet.

Even if the history is now persisted, you will notice that you running shell do not see this history. This is because the history is loaded only at the beginning of a new session.

The only thing left is to manually force a reload of the history with the command

history -r

Done. We have now access to other shells history.

The last question:

why don't we add the reload of the history directly in the PROMPT_COMMAND variable?

Because you probably don't want that. Having all your shells always sharing a global history will break the most obvious behavior of the shell that is to show you the previous command you typed in that very shell.

Friday, June 14, 2013

Maven: Start an external process without blocking your build


Let's assume that we have to execute a bunch of acceptance tests with a BDD framework like Cucumber as part of a Maven build.

Using Maven Failsafe Plugin is not complex. But it has an implicit requirement:
The container that hosts the implementation we are about to test needs to be already running.

Many containers like Jetty or JBoss provide their own Maven plugins, to allow to start the server as part of a Maven job. And there is also the good generic Maven Cargo plguin that offers an implementation of the same behavior for many different container.

These plugins allow for instance, to start the server at the beginning of a Maven job, deploy the implementation that you want to test, fire your tests and stop the server at the end.
All the mechanisms that I have described work and they are usually very useful for the various testing approaches.

Unluckily, I cannot apply this solution if my container is not a supported container. Unless obviuosly, I decide to write a custom plugin or add the support to my specific container to Maven Cargo.
In my specific case I had to find a way to use Red Hat's JBoss Fuse, a Karaf based container.
I decided to try keeping it easy and to not write a full featured Maven plugin and eventually to rely to GMaven plugin, or how I have recently read on the internet the "Poor Man's Gradle".

GMaven is basically a plugin to add Groovy support to you Maven job, allowing you to execute snippets of Groovy as part of your job. I like it because it allows me to inline scripts directly in the pom.xml.
It permits you also to define your script in a separate file and execute it, but that is exactly the same behaviour you could achieve with plain java and Maven Exec Plugin; a solution that I do not like much because hides the implementation and makes harder to imagine what the full build is trying to achieve.
 Obviously this approach make sense if the script you are about to write are simple enough to be autodescriptive.
 
I will describe my solution starting with sharing with you my trial and errors and references to various articles and posts I have found:


At first I have considered to use Maven Exec Plugin to directly launch my container. Something like what was suggested here

http://stackoverflow.com/questions/3491937/i-want-to-execute-shell-commands-from-mavens-pom-xml

   org.codehaus.mojo
   exec-maven-plugin
   1.1.1
   
     
       some-execution
       compile
       
         exec


     hostname
   
 
That plugin invocation, as part of a Maven job, actually allows me to start the container, but it has a huge drawback: he Maven lifecycle stops until the external process terminates or is manually stopped.
This is because the external process execution is "synchronous" and Maven doesn't consider the command execution finished, so, it never goes on with the rest of the build instructions.
This is not what I needed, so I have looked for something different.
At first I have found this suggestion to start a background process to allow Maven not to block:

http://mojo.10943.n7.nabble.com/exec-maven-plugin-How-to-start-a-background-process-with-exec-exec-td36097.html

The idea here is to execute a shell script, that start a background process and that immediately returns.
 
   org.codehaus.mojo
   exec-maven-plugin
   1.2.1
   
     
       start-server
       pre-integration-test
       
         exec
       
       
         src/test/scripts/run.sh
         
           {server.home}/bin/server


and the script is

#! /bin/sh
$* > /dev/null 2>&1 &
exit 0

This approach actually works. My Maven build doesn't stop and the next lifecycle steps are executed.

But I have a new problem now.  
My next steps are immediately executed.
I have no way to trigger the continuation only after my container is up and running.
Browsing a little more I have found this nice article:

http://avianey.blogspot.co.uk/2012/12/maven-it-case-background-process.html

The article, very well written, seems to describe exactly my scenario. It's also applied to my exact context, trying to start a flavour of Karaf.
It uses a different approach to start the process in background, the Antrun Maven plugin. I gave it a try and unluckily I am in the exact same situation as before. The integration tests are executed immediately, after the request to start the container but before the container is ready.

Convinced that I couldn't find any ready solution I decided to hack the current one with the help of some imperative code.
I thought that I could insert a "wait script", after the start request but before integration test are fired, that could check for a condition that assures me that the container is available.

So, if the container is started during this phase:

pre-integration-test

and my acceptance tests are started during the very next

integration-test

I can insert some logic in pre-integration-test that keeps polling my container and that returns only after the container is "considered" available.


import static com.jayway.restassured.RestAssured.*;
println("Wait for FUSE to be available")
for(int i = 0; i < 30; i++) {
    try{
        def response = with().get("http://localhost:8383/hawtio")
        def status = response.getStatusLine()
        println(status)
        } catch(Exception e){
            Thread.sleep(1000)
            continue
        }finally{
            print(".")
        }
        if( !(status ==~ /.*OK.*/) )
            Thread.sleep(1000)

}

And is executed by this GMaven instance:


    org.codehaus.gmaven
    gmaven-plugin
    
        1.8


            ########### wait for FUSE to be available ############
            pre-integration-test
            
                execute
            
            
                <![CDATA[
                            import static com.jayway.restassured.RestAssured.*;
                            ...
                            }
                            ]]>


My (ugly) script, uses Rest-assured and an exception based logic to check for 30 seconds if a web resource, that I know my container is deploying will be available.

This check is not as robust as I'd like to, since it checks for a specific resource but it's not necessary a confirmation that the whole deploy process has finished. Eventually, a better solution would be use some management API that could be able to check the state of the container, but honestly I do not know if they are exposed by Karaf and my simple check was enough for my limited use case.

With the GMaven invocation, now my maven build is behaving like I wanted.
This post showed a way to enrich your Maven script with some programmatic logic without the need of writing a full featured Maven plugin. Since you have full access to the Groovy context, you can think to perform any kind of task that you could find helpful. For instance you could also start background threads that will allow the Maven lifecycle to progress while keep executing your logic.

My last suggestion is to try keeping the logic in your scripts simple and to not turn them in long and complex programs. Readability was the reason I decided to use rest-assured instead of direct access to Apache HttpClient.

This is a sample full pom.xml


    4.0.0
    ${groupId}.${artifactId}
    
        xxxxxxx
        esb
        1.0.0-SNAPSHOT
    
    acceptance
    
        /data/software/RedHat/FUSE/fuse_full/jboss-fuse-6.0.0.redhat-024/bin/


                maven-failsafe-plugin
                2.12.2


                            integration-test
                            verify


                org.apache.maven.plugins
                maven-surefire-plugin
                
                    
                        **/*Test*.java


                        integration-test
                        
                            test
                        
                        integration-test
                        
                            
                                none
                            
                            
                                **/RunCucumberTests.java


                maven-antrun-plugin
                1.6
                
                    
                        ############## start-fuse ################
                        pre-integration-test


                            run


                maven-antrun-plugin
                1.6
                
                    
                        ############## stop-fuse ################
                        post-integration-test


                            run


                org.codehaus.gmaven
                gmaven-plugin
                
                    1.8


                        ########### wait for FUSE to be available ############
                        pre-integration-test
                        
                            execute
                        
                        
                            <![CDATA[
import static com.jayway.restassured.RestAssured.*;
println("Wait for FUSE to be available")
for(int i = 0; i < 30; i++) {
    try{
        def response = with().get("http://localhost:8383/hawtio")
        def status = response.getStatusLine()
        println(status)
        } catch(Exception e){
            Thread.sleep(1000)
            continue
        }finally{
            print(".")
        }
        if( !(status ==~ /.*OK.*/) )
            Thread.sleep(1000)

}
]]>


            info.cukes
            cucumber-java
            ${cucumber.version}
            test
        
        
            info.cukes
            cucumber-picocontainer
            ${cucumber.version}
            test
        
        
            info.cukes
            cucumber-junit
            ${cucumber.version}
            test
        
        
            junit
            junit
            4.11
            test


            org.apache.httpcomponents
            httpclient
            4.2.5
        
        
            com.jayway.restassured
            rest-assured
            1.8.1


Sunday, June 2, 2013

Eclipse for small screens on Linux

This post is inspired by a discussion with Sanne, of Hibernate team,  that introduced me to the customization secret to get back the missing space when you are using Eclipse with Linux on a small screen.


Some of this suggestions apply to different operating systems as well, but I am mainly focused on Linux.

This are my system specs, to give a context:

Fedora 18 with Gnome 3.6
Lenovo ThinkPad X220 12.5-inch
Screen resolution:  1366x768
JBoss Developer Studio 6 (based on Eclipse 4.2.1)


Let's start showing you a screenshot of my Eclipse( JBoss Developer Studio flavor, in my case ):


As you can see there isn't much space left to the code editor.

We can obviously improve the situation collapsing the various panel but the feeling is that we still have lots of space wasted space, stolen from the various toolbars:


The first tip to remove some wasted space is to apply some GTK customization. This trick could not be very well known, but considering the amount of posts on the internet that are reporting it, like http://blog.valotas.com/2010/02/eclipse-on-linux-make-it-look-good.html , we can expect to be an important secret.

The trick consists in passing Eclipse a specific configuration for the GTK theme it's using. This is performed externally respect of Eclipse, passing the customization in form of an environment variable.

Create a file with the following content:

style "gtkcompact" { 
 font_name="Liberation 8" 
 GtkButton::defaultborder={0,0,0,0} 
 GtkButton::defaultoutsideborder={0,0,0,0} 
 GtkButtonBox::childminwidth=0 
 GtkButtonBox::childminheigth=0 
 GtkButtonBox::childinternalpadx=0 
 GtkButtonBox::childinternalpady=0 
 GtkMenu::vertical-padding=0 
 GtkMenuBar::internalpadding=0 
 GtkMenuItem::horizontalpadding=2 
 GtkToolbar::internal-padding=0 
 GtkToolbar::space-size=0 
 GtkOptionMenu::indicatorsize=0 
 GtkOptionMenu::indicatorspacing=0 
 GtkPaned::handlesize=4 
 GtkRange::troughborder=0 
 GtkRange::stepperspacing=0 
 GtkScale::valuespacing=0 
 GtkScrolledWindow::scrollbarspacing=0 
 GtkExpander::expandersize=10 
 GtkExpander::expanderspacing=0 
 GtkTreeView::vertical-separator=0 
 GtkTreeView::horizontal-separator=0 
 GtkTreeView::expander-size=8 
 GtkTreeView::fixed-height-mode=TRUE 
 GtkWidget::focuspadding=0 
 xthickness=0 
 ythickness=0
} 


class "GtkWidget" style "gtkcompact"

style "gtkcompactextra" { 
 xthickness=0 ythickness=0 
} 
class "GtkButton" style "gtkcompactextra" 
class "GtkToolbar" style "gtkcompactextra" 
class "GtkPaned" style "gtkcompactextra" 


Start Eclipse assigning the path to that file to GTK2_RC_FILES environment variable:

GTK2_RC_FILES=/data/software/ext/eclipse_conf/layout.conf  ./jbdevstudio


Or if you are creating a shortcut or an entry in the start menu, use this version:

env GTK2_RC_FILES=/data/software/ext/eclipse_conf/layout.conf  ./jbdevstudio  


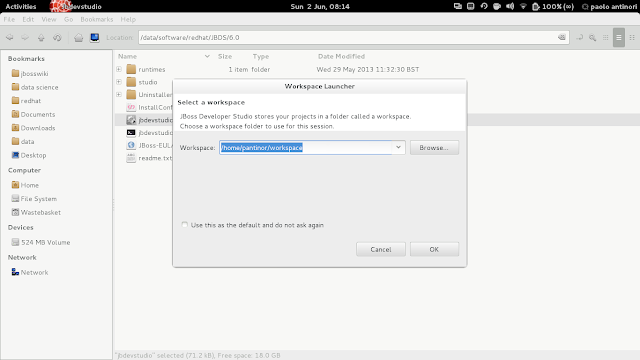
With this change in place, we are reducing some wasted space, and you will noticing the different starting from the workspace selection screen. Notice the difference in the buttons between the first and the second screen:

Without custom GTK style

With custom GTK style
Our modification impact the whole Eclipse style, as you can see here:


But there is still space for improvements. If you notice, we are dedicating a lot of space to the window title, that doesn't add particular value.

How can we reduce it? A way to reach this is via a Gnome Extension, Maximus, that will remove the title bar and will use Gnome bar instead.

We can enable Maximus in Gnome Extension website https://extensions.gnome.org/extension/354/maximus/:

Note:
Maximus by default applies its behavior to all the applications. This could save space in other apps, but you could prefer to have a finer control. In my case I do not want the feature in Sublime Text 2 since it doesn't integrate well. You can easily configure Maximus with the list of all the application you want its service applied or which one you do not want it applied via blacklisting and whitelisting.


With the following result:


Much better!

At this point we can try to reapply our full toolbar and thanks to all the optimizations, we are able to have it all on a single line. And consider that we obviously have the option in eclipse to specify which are the icons that we want to display and which instead we are not interested into.


There is now only an aspect that I'd like to improve, the tab size. I do believe that they are stealing a little too much space.

To modify them we have to change the .css files that control that aspect.

The base GTK theme .css file is

./plugins/org.eclipse.platform_4.2.2.v201302041200/css/e4_default_gtk.css


And we have to touch this section:


.MPartStack {
    font-size: 11;

Changing the font-size value to a smaller value, will reduce the wasted space.


In my particular case, since I have applied JBoss Developer Studio red theme, the file that I have to modify stays in another location:

 ./plugins/org.jboss.tools.central.themes_1.1.0.Final-v20130326-2027-B145.jar 


I have changed its value to 8 and obtained this result:


For some related links about the topic refer to:

http://stackoverflow.com/questions/11805784/very-large-tabs-in-eclipse-panes-on-ubuntu
http://wiki.eclipse.org/Eclipse4/CSS

Saturday, May 4, 2013

GateIn/JBoss Portal: InterPortlet + InterPage communcation with a Servlet Filter

The Problem

During a recent Java Portlets related project we were faced with a simple requirement that created us some trouble to solve it. The request this simple: we have to share some parameter between portlets defined in different pages of a GateIn based portal.

Apparently this task was harder than expected. In particular the greatest frustration was related to the inability to simply inject URL parameters, the easiest mechanism that many web technologies offers to pass non-critical values from one page to another.

When we tried this simple approach:

@Override
public void processAction(ActionRequest request, ActionResponse response)
        throws PortletException, PortletSecurityException, IOException {
    LOGGER.info("Invoked Action Phase");

    response.setRenderParameter("prp", "#######################");
    response.sendRedirect("/sample-portal/classic/getterPage");
}

But when the code was executed we were seeing this error in the logs:

14:37:32,455 ERROR [portal:UIPortletLifecycle] (http--127.0.0.1-8080-1) Error processing the action: sendRedirect cannot be called after setPortletMode/setWindowState/setRenderParameter/setRenderParameters has been called previously: java.lang.IllegalStateException: sendRedirect cannot be called after setPortletMode/setWindowState/setRenderParameter/setRenderParameters has been called previously
    at org.gatein.pc.portlet.impl.jsr168.api.StateAwareResponseImpl.checkRedirect(StateAwareResponseImpl.java:120) [pc-portlet-2.4.0.Final.jar:2.4.0.Final]
...

We are used to accept specifications limits but we are also all used to exceptional requests from our customers. So my task was to trying to find a solution to this problem.

A solution : a Servlet Filter + WrappedResponse

I could have probably have found some other way to reach what we wanted, but I had a certain amount of fun playing with the abstraction layers that Servlet offer us.

One of the main reason while we are receiving that exception is because we can not trigger a redirect on a response object if the response has already started to stream the answer to the client.

Another typical exception the you could have encounter when you are playing with these aspects is:

java.lang.IllegalStateException: Response already committed 

More in general I have seen this behaviour happening in other technologies as well, like when in PHP you try to wrtie a cookie after you have already started to send some output to a client.

Since the limitation we have to find some way to deviate from this behaviour to allow us to perform our redirect and still accept our parameters.

One standard and interesting way to "extend" the default behaviour of Servlet based applications is via Filters. We can think to inject our custom behaviour to modify the normal workflow of any application. We just have to pay attention to not break anything!

Here comes our filter:

public class PortletRedirectFilter implements javax.servlet.Filter {

    private static final Logger LOGGER = Logger
            .getLogger(PortletRedirectFilter.class);

    private FilterConfig filterConfig = null;

    public void doFilter(ServletRequest request, ServletResponse response,

    FilterChain chain) throws IOException, ServletException {

        LOGGER.info("started filtering all urls defined in the filter url mapping ");

        if (request instanceof HttpServletRequest) {
            HttpServletRequest hsreq = (HttpServletRequest) request;

            // search for a GET parameter called as defined in REDIRECT_TO
            // variable
            String destinationUrl = hsreq.getParameter(Constants.REDIRECT_TO);

            if (destinationUrl != null) {
                LOGGER.info("found a redirect request " + destinationUrl);
                // creates the HttpResponseWrapper that will buffer the answer
                // in memory
                DelayedHttpServletResponse delayedResponse = new DelayedHttpServletResponse(
                        (HttpServletResponse) response);
                // forward the call to the subsequent actions that could modify
                // externals or global scope variables
                chain.doFilter(request, delayedResponse);

                // fire the redirection on the original response object
                HttpServletResponse hsres = (HttpServletResponse) response;
                hsres.sendRedirect(destinationUrl);

            } else {
                LOGGER.info("no redirection defined");
                chain.doFilter(request, response);
            }
        } else {
            LOGGER.info("filter invoked outside the portal scope");
            chain.doFilter(request, response);
        }

    }
...

As you can see the logic inside the filter is not particularly complex. We start checking for the right kind of Request object since we need to cast it to HttpServletRequest to be able to extract GET parameters from them.

After this cast we look for a specific GET parameter, that we will use in our portlet for the only purpose of specifying the address we want to redirect to. Nothing will happen in case we won't find the redirect parameter set, so the filter will implement the typical behaviour to forward to the eventual other filters in the chain.

But the real interesting behaviour is defined when we identify the presence of the redirect parameter.

If we would limit ourself to forward the original Response object we will received the error we are trying to avoid. Our solution is to wrap the Response object that we are forwarding to the other filters in a WrappedResponse that will buffer the response so that it won't be streamed to the client but will stay in memory.

After the other filters complete their job we can then safely issue a redirect instruction that won't be rejected since we are firing it on a fresh Response object and not on one that has already been used by other components.

We now only need to uncover the implementation of DelayedHttpServletResponse and of its helper class ServletOutputStreamImpl:

public class DelayedHttpServletResponse extends HttpServletResponseWrapper {
    protected HttpServletResponse origResponse = null;
    protected OutputStream temporaryOutputStream = null;
    protected ServletOutputStream bufferedServletStream = null;
    protected PrintWriter writer = null;

    public DelayedHttpServletResponse(HttpServletResponse response) {
        super(response);
        origResponse = response;
    }

    protected ServletOutputStream createOutputStream() throws IOException {
        try {

            temporaryOutputStream = new ByteArrayOutputStream();

            return new ServletOutputStreamImpl(temporaryOutputStream);
        } catch (Exception ex) {
            throw new IOException("Unable to construct servlet output stream: "
                    + ex.getMessage(), ex);
        }
    }

    @Override
    public ServletOutputStream getOutputStream() throws IOException {

        if (bufferedServletStream == null) {
            bufferedServletStream = createOutputStream();
        }
        return bufferedServletStream;
    }

    @Override
    public PrintWriter getWriter() throws IOException {
        if (writer != null) {
            return (writer);
        }

        bufferedServletStream = getOutputStream();

        writer = new PrintWriter(new OutputStreamWriter(bufferedServletStream,
                "UTF-8"));
        return writer;
    }

}

DelayedHttpServletResponse implements the Decorator pattern around HttpServletResponse and what it does is keeping a reference to the original Response object that is decorating and instantiating a separated OutputStream that all the components that use ServletResponse object want to use.
This OutputStream will write to an in memory buffer that will not reach the client but that will enable the server to keep on processing the call and generating all the server side interaction related to the client session.

Implementation of ServletOutputStreamImpl is not particularly interesting and is a basic (and possibly incomplete) implementation of ServletOutputStream abstract class:

public class ServletOutputStreamImpl extends ServletOutputStream {

    OutputStream _out;
    boolean closed = false;

    public ServletOutputStreamImpl(OutputStream realStream) {
        this._out = realStream;
    }

    @Override
    public void close() throws IOException {
        if (closed) {
            throw new IOException("This output stream has already been closed");
        }
        _out.flush();
        _out.close();

        closed = true;
    }

    @Override
    public void flush() throws IOException {
        if (closed) {
            throw new IOException("Cannot flush a closed output stream");
        }
        _out.flush();
    }

    @Override
    public void write(int b) throws IOException {
        if (closed) {
            throw new IOException("Cannot write to a closed output stream");
        }
        _out.write((byte) b);
    }

    @Override
    public void write(byte b[]) throws IOException {
        write(b, 0, b.length);
    }

    @Override
    public void write(byte b[], int off, int len) throws IOException {
        if (closed) {
            throw new IOException("Cannot write to a closed output stream");
        }
        _out.write(b, off, len);
    }

}

This is all the code that we need to enable the required behaviour. What remains left is registering the filter.

We are going to configure GateIn web descriptor, portlet-redirect/war/src/main/webapp/WEB-INF/web.xml

<!-- Added to allow redirection of calls after Public Render Parameters have been already setted.-->

<filter>
  <filter-name>RedirectFilter</filter-name>
  <filter-class>paolo.test.portal.servletfilter.PortletRedirectFilter</filter-class>
</filter>  

<filter-mapping>
  <filter-name>RedirectFilter</filter-name>
  <url-pattern>/*</url-pattern>
</filter-mapping>

Remember to declare it as the first filter-mapping so that it will be executed as first, and all the subsequent filters will receive the BufferedResponse object.

And now you can do something like this in your portlet to use the filter:

@Override
protected void doView(RenderRequest request, RenderResponse response)
        throws PortletException, IOException, UnavailableException {
    LOGGER.info("Invoked Display Phase");
    response.setContentType("text/html");
    PrintWriter writer = response.getWriter();

    /**
     * generates a link to this same portlet instance, that will trigger the
     * processAction method that will be responsible of setting the public
     * render paramter
     */
    PortletURL portalURL = response.createActionURL();

    String requiredDestination = "/sample-portal/classic/getterPage";
    String url = addRedirectInfo(portalURL, requiredDestination);


    writer.write(String
            .format("<br/><A href='%s' style='text-decoration:underline;'>REDIRECT to %s and set PublicRenderParameters</A><br/><br/>",
                    url, requiredDestination));
    LOGGER.info("Generated url with redirect parameters");

    writer.close();

}

/**
 * Helper local macro that add UC_REDIRECT_TO GET parameter to the Url of a
 * Link
 * 
 * @param u
 * @param redirectTo
 * @return
 */
private String addRedirectInfo(PortletURL u, String redirectTo) {
    String result = u.toString();
    result += String.format("&%s=%s", Constants.REDIRECT_TO, redirectTo);
    return result;
}

/*
 * sets the public render paramter
 */
@Override
public void processAction(ActionRequest request, ActionResponse response)
        throws PortletException, PortletSecurityException, IOException {
    LOGGER.info("Invoked Action Phase");

    response.setRenderParameter("prp", "#######################");
}

You will see that you will be able to set the Render Parameter during the Action phase and you wil be able to specify during the RenderPhase the Parameter that will trigger the filter to issue a redirect.

Files

I have created a repo with a working sample portal, that defines a couple of portal pages, some portlet and the filter itself so that you will be able to verify the behaviour and playing the the application.

https://github.com/paoloantinori/gate-in-portlet-portlet-redirect-filter

In the README.md you will find the original instruction from the GateIn project to build and deploy the project on JBoss AS 7. In particular pay attention to the section from standalone.xml that you are required to uncomment to enable the configuration that the sample portal relies on.

My code additions does not require any extra configuration.

The portal I created is based on GateIn sample portal quickstart that you can find here:

https://github.com/paoloantinori/gate-in-portlet-portlet-redirect-filter

If you clone GateIn repo remember to switch to 3.5.0.Final tag, so that you will be working with a stable version that you can match with the full GateIn distribution + JBoss AS 7 that you can download from here:

https://github.com/paoloantinori/gate-in-portlet-portlet-redirect-filter

Thursday, February 14, 2013

Refresh your shell when the filesystem is out of sync

This tip could be so obvious that you savvy reader could laugh at me or wonder why to write a blog post about it. But this problem bothered me since a while.

In particular when dealing with svn.

If you are in a command line shell and and you update or checkout the remote resources it could happen that your shell session is not able to see the modifications. It could be that you download a file via svn co but an ls command doesn't reflect the modification showing the new file.

It's like if the filesystem is out of sync.

In these cases, you could already discovered yourself that if you change folder and you revert back to it, the shell session "updates" it's content and shows you the files you were looking for.

Well, this works but it have always annoyed me to change folder to trigger this behaviour.

Until the other day. When I discovered that

cd .

Does the trick! Without changing folder, you are now able to refresh your folder view!

I hope this post could help someone else with the same problem, since when I tried to look for the solution on the internet the last time, I wasn't able to find the right combination of keyword to spot this tip that I am sure is out there!

Enjoy!

Wednesday, February 13, 2013

Post a file to a web page as part of a Maven build process

In a previous post Rest Invocation with Maven I've seen how to invoke a REST service from a Maven Pom file, using the Maven Groovy plugin.

In this post I will show how to upload a file to a webpage, still using some Groovy code.

We will do this in 2 different ways: using plain Apache Http Client and using Rest-assured, the library already described here in this previous post, Rest Assured or Rest-very-Easy

Apache Http Client

Groovy Script
import org.apache.http.impl.client.DefaultHttpClient
import org.apache.http.client.methods.HttpPost
import org.apache.http.entity.mime.MultipartEntity
import org.apache.http.entity.mime.content.FileBody
import org.apache.http.auth.AuthScope
import org.apache.http.auth.UsernamePasswordCredentials

def name = "${input_file}"
log.info( "Archive file: $name" )

def f = new File(name)

// The execution:
DefaultHttpClient httpclient = new DefaultHttpClient()
httpclient.getCredentialsProvider().setCredentials(
     new AuthScope(AuthScope.ANY_HOST, AuthScope.ANY_PORT), 
     new UsernamePasswordCredentials( "${username}", 
          "${password}" )
)

def post = new HttpPost("${form_endpoint}")
def entity = new MultipartEntity()
def fileBody = new FileBody(f)
entity.addPart("file", fileBody)
post.setEntity(entity)

def response = httpclient.execute(post)
def status = response.getStatusLine()
if( !(status ==~ /.*OK.*/) )
     fail("Unable to deploy. Return status code: $status" )
else
     log.info("Deployment Successful: Result status code $status")
Maven configuration
    
      deploy
      
        
          org.apache.httpcomponents
          httpmime
          4.2.1
        
        
          org.apache.httpcomponents
          httpcore
          4.2.1
        
        
          org.apache.httpcomponents
          httpclient
          4.2.1


            org.codehaus.groovy.maven
            gmaven-plugin
            1.0
            
              
                initialize
                
                  execute


Rest-assured

The solution based on HttpClient works fine but it's a little clumsy. We have already agreed that having a script embedded in a pom.xml file is handy but not as clean as writing a full featured Maven Plugin. But even without a complete Maven Plugin we can improve the readability of the script thanks to Rest-assured and the fluent style that allows us to write a much cleared script.

And at the same time we can reduce the number of the direct dependencies in our pom.xml, since we are delegating the rest-assured itself to declare what it needs, that by the way, is again Apache Http Client, since Rest-assured is based on it.

Notice that my script distinguish between .zip and non zip input files, but this distinction it's only dued to the fact that my endpoint was "confused" when I was passing an .zip file without specifying any mimetype. The default mimetype for rest-assured, when you use an overloaded version of .multipart() is application/octet-stream

Groovy Script
import static com.jayway.restassured.RestAssured.*;

def name = "${input_file}"

log.info("Uploading Archive file: $name")

//we have to determine the mimetype to correctly support both zip and xml

def mimeType = name.endsWith("zip") ? "application/zip" : "application/xml"

def f = new File(name)

def response =  with()
   .auth().basic("${username}", "${password}")
   .multiPart("file", f, mimeType)
   .post("${form_endpoint")

def status = response.getStatusLine()
if( !(status ==~ /.*OK.*/) )
     fail("Unable to deploy. Return status code: $status" )
else
     log.info("Deployment Successful: Result status code $status")
Maven configuration
    
      deploy
      
        
          com.jayway.restassured
          rest-assured
          1.4


            org.codehaus.groovy.maven
            gmaven-plugin
            1.0
            
              
                initialize
                
                  execute


Saturday, January 26, 2013

Does Google know who I am? (considering that I have already told him...)

Today I have sent an email to give my opinion about a service and to ask the service provider to consider an improvement.

When I was just about to send it I wondered if the receiver could have been able, if interested in what I have written, to do a lookup up of my mail address and find the pages that represent me better since the address is the one I use in formal communication.

As pages that represent me I mean stuff like my Facebook, Google+, LinkedIn pages, in my case.

And since my email was in the form of "NAME.SURNAME@gmail.com" , a typical standard if you are lucky enough to find it available when you create an email account with a specific provider, I was expecting it to work properly.

So I performed a test and I have browsed for my official email address in Google search, and to try limit as much as possible, all the tracking informations that my browser could send or remember, I performed my test with an instance of Firefox in Private Mode.

And the result turned to be interesting:

Google identified me correctly... for the first 4 results:

  1. It finds one of my projects on GitHub
  2. It finds my national LinkedIn page
  3. It finds me on LinkedIn.com
  4. It finds my Google+ Page

But it screws it completely for the rest of the first result page links:

For what I have seen from those links, yes, I can say that both my name and my surname, taken independetly are present in the results, but not only I have nothing to do with those pages, but my original query, my NAME.SURNAME@gmail.com email is not there at all and they are not even listing my omonimous.
The pages are not even including the NAME.SURNAME string, that I could expect it may exists as the username chosen by any of my omonimous that could have open an account with providers other than Gmail.

Instead no, the logic that I can guess is that the Google algorithm has not identified my query as an email address and looked just for that.
This behaviour is not completely surprising, since I can expect that the "Did you mean?" functionality could be based on some soundex algorithm or eventually on other statistics and metrics, but the suggested pages are not containing any evident variation of my email address.

It seems to me that email addresses are searched just like any other query on Google and no particular optimization is applied to them. This is definitely surprising, considering the many optimizations or even easter eggs that we can find in the engine:

Try to search for "Apple stock", "1 eur in dollar" or pay attention to the suggested correction when trying to search for "recursion".

I am a software engineer but not an expert in search engines at all, so I do not know if the problem that I am describing is crazy complex or not, but from a user point of view, I do believe that a very common use case is not correctly managed by the search engine.

I know that Search Engine Optimization is a discipline on its own, but my use case is much simpler I think.

From a smart search engine I would expect that if search for an email, the engine would be able to automatically try to look for just the sequence of characters that I have put in the search bar.
Eventually I'd like to receive some suggestion for eventual typos if the system does not find results. I could also accepts suggestion based on similar words, but still in the context of email addresses not just in the the body of other pages.

From a smarter search engine I would expect it to guess that a TOKEN1.TOKEN2 would lead the engine to at least give priority to the option that TOKEN1 could be my name and TOKEN2 could be my surname, and eventually enforce its opinion based of some statistic that could prove that TOKEN1 is indeed a common first name.

I'm saying it again. I really have no clue how doable this idea is, but I do believe that it should not be much harder than now when parts of my search results are correct and others are instead very unrelated to search.

Other interesting considerations based only on my single test:

  • Google finds a page with my full email on Github, because it was on a README text file that I have uploaded there, but it's not suggesting my profile page that still shows publicly my email address.
  • Google+, that also has my official mail public, it's only fourth
  • the ninth result, that is a YouTube page, finds a post of one omonimous of mine.
  • when I searched Google passing my email enclosed by quotes, I receive only 2 results back: the same GitHub page and a scam page.

Java - Handmade Classloader Isolation

In a recent project we had a typical libraries conflict problem.

One component that we could control wanted a specific version of an Apache Commons library, while another component was expecting a different one.

Due to external constraints we could not specify any class loading isolation at the Container level. It wasn't an option for us.

What we decided to do instead has been to use the two different classes definition at the same time.

To obtain this we had to let one class be loaded by the current thread class loader and to load manually the second one; in this way the two classes still have the same fully qualified name.

The only restriction to this approach is the we had to interact with the manually loaded class only via reflection, since the current context, that is using a different class loader, has a different definition of a class and we would be able to cast or assign a instance of the class loaded with a classloader to a variable defined in the context of the other.

Our implementation is in effect a Classloader itself:

DirectoryBasedParentLastURLClassLoader extends ClassLoader

The characteristic of this Classloader is that we are passing it a file system folder path:

public DirectoryBasedParentLastURLClassLoader(String jarDir)

Our implementation scans the filesystem path to produce URLs and uses this information to pass them to a wrapped instance of a URLClassLoader that we are encapsulating with our CustomClassloader:

public DirectoryBasedParentLastURLClassLoader(String jarDir) {
    super(Thread.currentThread().getContextClassLoader());

    // search for JAR files in the given directory
    FileFilter jarFilter = new FileFilter() {
        public boolean accept(File pathname) {
            return pathname.getName().endsWith(".jar");
        }
    };

    // create URL for each JAR file found
    File[] jarFiles = new File(jarDir).listFiles(jarFilter);
    URL[] urls;

    if (null != jarFiles) {
        urls = new URL[jarFiles.length];

        for (int i = 0; i < jarFiles.length; i++) {
            try {
                urls[i] = jarFiles[i].toURI().toURL();
            } catch (MalformedURLException e) {
                throw new RuntimeException(
                        "Could not get URL for JAR file: " + jarFiles[i], e);
            }
        }

    } else {
        // no JAR files found
        urls = new URL[0];
    }

    childClassLoader = new ChildURLClassLoader(urls, this.getParent());
}

With this setup we can override the behaviour of the main classloading functionality, giving priority to the loading from our folder and falling back to the parent classloader only if we could find the requested class:

@Override
protected synchronized Class loadClass(String name, boolean resolve)
        throws ClassNotFoundException {
    try {
        // first try to find a class inside the child classloader
        return childClassLoader.findClass(name);
    } catch (ClassNotFoundException e) {
        // didn't find it, try the parent
        return super.loadClass(name, resolve);
    }
}

With our CustomClassloader in place we can use it in this way:

//instantiate our custom classloader
DirectoryBasedParentLastURLClassLoader classLoader = new DirectoryBasedParentLastURLClassLoader(
        ClassLoaderTest.JARS_DIR    );
//manually load a specific class
Class classManuallyLoaded = classLoader
        .loadClass("paolo.test.custom_classloader.support.MyBean");
//request a class via reflection
Object myBeanInstanceFromReflection = classManuallyLoaded.newInstance();
//keep using the class via reflection
Method methodToString = classManuallyLoaded.getMethod("toString");
assertEquals("v1", methodToString.invoke(myBeanInstanceFromReflection));

This idea for this post and part of its code come from this interesting discussion on Stackoverflow

A fully working Maven project is available on GitHub with a bunch of unit tests to verify the right behaviour.

Tuesday, January 15, 2013

Java: Rest-assured (or Rest-Very-Easy)


Recently I had to write some Java code to consume REST services over HTTP.

I've decided to use the Client libraries of RestEasy, the framework I use most of the time to expose REST services in Java, since it also implements the official JAX-RS specification.

I am very satisfied with the annotation driven approach that the specification defines and it makes exposing REST services a very pleasant task.

But unluckily I cannot say that I like the client API the same way.

If you are lucky enough to be able to build a proxy client based on the interface implemented by the service, well, that's not bad:

import org.jboss.resteasy.client.ProxyFactory;
...
// this initialization only needs to be done once per VM
RegisterBuiltin.register(ResteasyProviderFactory.getInstance());


SimpleClient client = ProxyFactory.create(MyRestServiceInterface.class, "http://localhost:8081");
client.myBusinessMethod("hello world");
Having a Proxy client similar to a  JAX-WS one is good, I do agree. But most of the time, when we are consuming REST web service we do not have a Java interface to import.
All those Twitter, Google or whatever public rest services available out there are just HTTP endpoints.

The way to go with RestEasy in these cases is to rely on the RestEasy Manual ClientRequest API:

ClientRequest request = new ClientRequest("http://localhost:8080/some/path");
request.header("custom-header", "value");

// We're posting XML and a JAXB object
request.body("application/xml", someJaxb);

// we're expecting a String back
ClientResponse<String> response = request.post(String.class);

if (response.getStatus() == 200) // OK!
{
   String str = response.getEntity();
}
That is in my opinion a very verbose way to fetch what is most of the time, just a bunch of strings from the web. And it gets even worse if you need to include Authentication informations:

// Configure HttpClient to authenticate preemptively
// by prepopulating the authentication data cache.
 
// 1. Create AuthCache instance
AuthCache authCache = new BasicAuthCache();
 
// 2. Generate BASIC scheme object and add it to the local auth cache
BasicScheme basicAuth = new BasicScheme();
authCache.put("com.bluemonkeydiamond.sippycups", basicAuth);
 
// 3. Add AuthCache to the execution context
BasicHttpContext localContext = new BasicHttpContext();
localContext.setAttribute(ClientContext.AUTH_CACHE, authCache);
 
// 4. Create client executor and proxy
httpClient = new DefaultHttpClient();
ApacheHttpClient4Executor executor = new ApacheHttpClient4Executor(httpClient, localContext);
client = ProxyFactory.create(BookStoreService.class, url, executor);

I have found that Rest-assured  provide a much nicer API to write client invocations.
Officially the aim of the project is to create a testing and validating framework; and most of the tutorials out there are covering those aspects, like the recent Heiko Rupp's one: http://pilhuhn.blogspot.nl/2013/01/testing-rest-apis-with-rest-assured.html

I suggest  yout, instead, to use it as a development tool to experiment and write REST invocation very rapidly.

What is important to know about rest-assured:

  •  it implements a Domain Specific Language thanks to fluid API
  •  it is a single Maven dependency
  •  it almost completely expose a shared style for both xml and json response objects
  •  it relies on Apache Commons Client

So, I'll show you a bunch of real world use cases and I will leave you with some good link if you want to know more.

As most of the DSL on Java, it works better if you import statically the most
important objects:
import static   com.jayway.restassured.RestAssured.*;
import static   com.jayway.restassured.matcher.RestAssuredMatchers.*;
Base usage:
get("http://api.twitter.com/1/users/show.xml").asString();

That returns:

  Sorry, that page does not exist

Uh oh, some error. Yeah, we need to pass some parameter:
with()
    .parameter("screen_name", "resteasy")
.get("http://api.twitter.com/1/users/show.xml").asString();

That returns:

  27016395
  Resteasy
  resteasy
  
  http://a0.twimg.com/sticky/default_profile_images/default_profile_0_normal.png
  https://si0.twimg.com/sticky/default_profile_images/default_profile_0_normal.png
  
  jboss.org/resteasy

JBoss/Red Hat REST project
  false
  244
  C0DEED
  333333
  0084B4
  DDEEF6
  C0DEED
  1
  Fri Mar 27 14:39:52 +0000 2009
  0
  
  
  http://a0.twimg.com/images/themes/theme1/bg.png
  https://si0.twimg.com/images/themes/theme1/bg.png
  false
  true
  false
  false
  8
  en
  false
  false
  21
  true
  true
...

Much better! Now, let's say that we want only a token of this big String XML:
with()
    .parameter("screen_name", "resteasy")
.get("http://api.twitter.com/1/users/show.xml")
    .path("user.profile_image_url")

And here's our output:
http://a0.twimg.com/sticky/default_profile_images/default_profile_0_normal.png

What if it was a JSON response?
with()
    .parameter("screen_name", "resteasy")
.get("http://api.twitter.com/1/users/show.json")

And here's our output:
{"id":27016395,"id_str":"27016395","name":"Resteasy","screen_name":"resteasy","location":"","url":null,"description":"jboss.org\/resteasy\n\nJBoss\/Red Hat REST project","protected":false,"followers_count":244,"friends_count":1,"listed_count":21,"created_at":"Fri Mar 27 14:39:52 +0000 2009","favourites_count":0,"utc_offset":null,"time_zone":null,"geo_enabled":false,"verified":false,"statuses_count":8,"lang":"en","status":{"created_at":"Tue Mar 23 14:48:51 +0000 2010","id":10928528312,"id_str":"10928528312","text":"Doing free webinar tomorrow on REST, JAX-RS, RESTEasy, and REST-*.  Only 40 min, so its brief.  http:\/\/tinyurl.com\/yz6xwek","source":"web","truncated":false,"in_reply_to_status_id":null,"in_reply_to_status_id_str":null,"in_reply_to_user_id":null,"in_reply_to_user_id_str":null,"in_reply_to_screen_name":null,"geo":null,"coordinates":null,"place":null,"contributors":null,"retweet_count":0,"favorited":false,"retweeted":false},"contributors_enabled":false,"is_translator":false,"profile_background_color":"C0DEED","profile_background_image_url":"http:\/\/a0.twimg.com\/images\/themes\/theme1\/bg.png","profile_background_image_url_https":"https:\/\/si0.twimg.com\/images\/themes\/theme1\/bg.png","profile_background_tile":false,"profile_image_url":"http:\/\/a0.twimg.com\/sticky\/default_profile_images\/default_profile_0_normal.png","profile_image_url_https":"https:\/\/si0.twimg.com\/sticky\/default_profile_images\/default_profile_0_normal.png","profile_link_color":"0084B4","profile_sidebar_border_color":"C0DEED","profile_sidebar_fill_color":"DDEEF6","profile_text_color":"333333","profile_use_background_image":true,"default_profile":true,"default_profile_image":true,"following":null,"follow_request_sent":null,"notifications":null}

And the same interface undestands JSON object navigation. Note that the navigation expression does not include "user" since it was not there in the full json response:
with()
    .parameter("screen_name", "resteasy")
.get("http://api.twitter.com/1/users/show.json")
    .path("profile_image_url")

And here's our output:
http://a0.twimg.com/sticky/default_profile_images/default_profile_0_normal.png

Now an example of Path Parameters:
with()
    .parameter("key", "HomoSapiens")
.get("http://eol.org/api/search/{key}").asString()

Information about the http request:
get("http://api.twitter.com/1/users/show.xml").statusCode();
get("http://api.twitter.com/1/users/show.xml").statusLine();

An example of Basic Authentication:
with()
  .auth().basic("paolo", "xxxx")
.get("http://localhost:8080/b/secured/hello")
  .statusLine()

An example of Multipart Form Upload
with()
    .multiPart("file", "test.txt", fileContent.getBytes())
.post("/upload")

Maven dependency:

 com.jayway.restassured
 rest-assured
 1.4
 test


And a Groovy snippet that can be pasted and executed directly in groovyConsole thanks to Grapes fetches the dependencies and add them automatically to the classpath, that shows you JAXB support:
@Grapes([  
    @Grab("com.jayway.restassured:rest-assured:1.7.2")
])
import static   com.jayway.restassured.RestAssured.*
import static   com.jayway.restassured.matcher.RestAssuredMatchers.*
import  javax.xml.bind.annotation.*


@XmlRootElement(name = "user")
@XmlAccessorType( XmlAccessType.FIELD )
    class TwitterUser {
        String id;
        String name;
        String description;
        String location;

        @Override
        String toString() {
            return "Id: $id, Name: $name, Description: $description, Location: $location"
        }

    }

println with().parameter("screen_name", "resteasy").get("http://api.twitter.com/1/users/show.xml").as(TwitterUser.class)

//


This is just a brief list of the features of the library, just you an idea of how easy it is to work with it. For a further examples I suggest you to read the official pages here:

https://code.google.com/p/rest-assured/wiki/Usage

Or another good tutorial here with a sample application to play with:

http://www.hascode.com/2011/10/testing-restful-web-services-made-easy-using-the-rest-assured-framework